I am super pumped.
It took some outside consultation, the help of a friend, and some jerry-rigging with a clothespin, but I successfully made a ball of mozzarella cheese. It. is. delicious.
I bought a kit online from Crimson Carrot. It contains 3 rennet tablets (you only need one quarter of a tablet per batch,) fine cheesecloth (finer than the cheesecloth at the supermarket,) citric acid, salt, and a thermometer.
 |
| Adorbs. |
You need to supply a gallon of milk- preferably whole, and NOT ultra-pasturized (but regular pasturized is ok.) You also need non-chlorinated water. I didn't read this carefully enough the first time, but they say if you leave water out overnight uncovered the chlorine will evaporate out. You need 2 cups for a recipe.
SO. I followed the directions inside the package. There are duplicate directions available on the company's website, so if you have whey spillage on them or something you're still ok. Add the dissolved citric acid to a gallon of milk in a pot, stir it, and heat it. Then add the dissolved rennet and let it heat up further. It kind of congeals into a mass of curds (white solids) floating in whey (a shockingly yellow clear liquid.)
 |
| Eew. |
This is where I messed up the first time. I scooped and all of my beautiful curds turned to mush. This happened twice. All was not lost- I'll show you what I ended up with at the end of this post. But for the sake of continuity, I'll tell you the RIGHT way to do things here.
I wanted to trouble-shoot and figure out what I was doing wrong, so I watched a million youtube videos. They all seemed to be telling me to do what I was already doing so I went to the Urban Cheesecraft website and wrote them an email explaining my troubles. To my delight, I got an email back within a few hours from Cheesy Experience Officer Claudia with lots of suggestions and encouragement. It turns out I was scooping my curds too soon and needed to let them firm up a little longer before I took them out of the whey. Claudia also directed me to the company's facebook page which has a whole photo album of what it should look like at each step. It was super helpful.
So when I scooped the curds out the right way (after cooking,) they looked like this:
 |
| See that 3-D chunkiness? That is what you want. |
If it's not cooked enough, it will look like this:
 |
| Basically froth. It looks kind of like egg drop soup. |
If it looks like the latter, cook it at 105-110 F for about 5 minutes until the curds get a little rubberier. SO. Scoop that out into a microwaveable dish. I used a pyrex baking dish, which I recommend because the corner made it easy to pour from. You'll be microwaving this for short bursts and draining off whey in between.
 |
| This is at the beginning of that process. |
 |
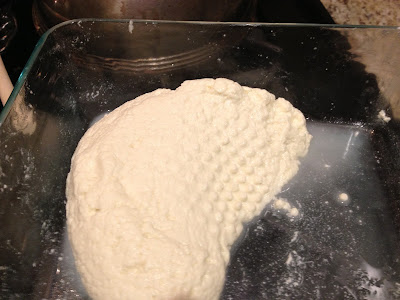
| This is a few rounds later. Those grid marks are from pressing with my slotted spoon. See how it's starting to firm up? |
This is what is left over:
 |
| I'll give you a dollar if you drink it. |
When the curds get up to 135 F, you'll knead them gently with your spoons. This is the time to salt your cheese. The directions don't specify how much salt to use, so I used a little less than a teaspoon of my own fancy snobby sea salt. I bet theirs is delicious too- I just got a new salt box and am pumped about using it.
When it's cool enough to handle, stretch it gently until it becomes shiny and then shape it into a ball. Tear off a little to taste, and then get really pumped because it is DELICIOUS. And you made it. Woo!
 |
| Cheeeeeeeeeeeeese! |
Hooray!
 |
| #cheeseformayor |
Ok, now time for showing you what it looked like when I failed. Spoiler: still delicious. When I scooped the curds too soon, I ended up with this mush that just wouldn't solidify. I tried draining it with a cheesecloth, but that didn't help much. It looked like this:
 |
| Womp womp. |
 |
| It mocked me so. |
So I decided to shift my expectations and eat it like a soft fresh farmer cheese. It was super good with a Triscuit and blueberries
 |
| #nofilter |
and on Wasa with this toasted almond arugala pesto I had lying around.
 |
| #yuppie |
 |
| please ignore the nautical spoon |
and put on cracker with tomatoes and basil:
 |
| enlarged to humblebrag |
 |
| Ok, just one more. |
I'm probably going to use the finished successful mozzarella in a caprese salad tomorrow, but for now I'm cheesed out. All in all I had a ton of fun- I made a lot of super tasty cheeses, all of which I'd happily serve to guests. I was so pleased with the support I got from Urban Cheesecraft I actually made 2 batches in one day.
If you want your own cheese kit you can grab one at Crimson Carrot! They're cheap, and they make a lot of batches. Also, full disclosure, the owners are real nice kids.
Good luck!