The key to a good collage project is having good materials for the kids to look through. I found that Real Simple, some yoga magazines, art magazines, and some family/parenting magazines tended to have images that kids could relate to and get inspired by- and images that weren't overly sexual or misogynist. I put on some fun music while the kids made these, and then they took turns telling stories about each other's collages. It was lots of fun, and was like two projects in one!
Oh hello!
I'm Meg. I make stuff.
Showing posts with label rainy day activities. Show all posts
Showing posts with label rainy day activities. Show all posts
Monday, September 16, 2013
Thursday, September 12, 2013
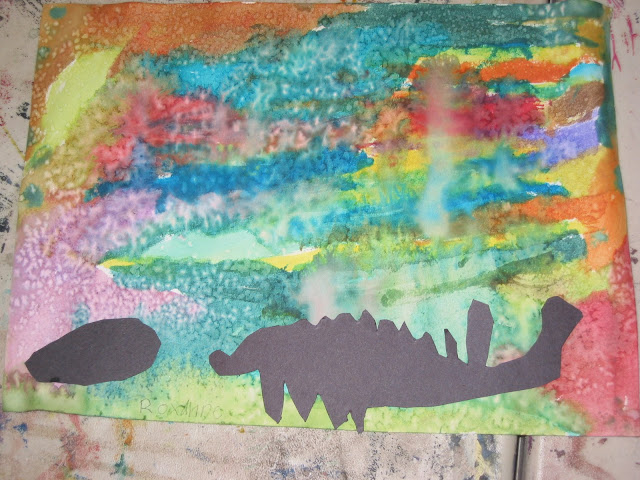
Salty Watercolors
Did you know if you sprinkle salt on a still-wet watercolor it makes absolutely gorgeous crystal shapes on it?
Here are some dinosaur silhouette sunsets I did with 6-8 year olds.
 |
| We added construction paper cut-outs on top |
Make sure the salt is the last step- painting over it will ruin the effect. Different wetnesses provide different effects. I've found it looks best when the paper is still quite damp to the touch, but not puddling.
This effect is also fun if you draw a snowman with white crayon on white paper, then paint over with blue and add salt. It looks like snow!
The salt transformation is really fun and happens over the span of a couple of minutes. When it's dry you may want to brush off the salt crystals with your hand, or leave them there because sometimes it makes the picture look sparkly!
The salt transformation is really fun and happens over the span of a couple of minutes. When it's dry you may want to brush off the salt crystals with your hand, or leave them there because sometimes it makes the picture look sparkly!
Sunday, January 29, 2012
Fun Color Experiment
Step one: Pour milk into a shallow dish. Drip 4 little blobs of food coloring near the middle, like so:
Step 2: Gently drop one drop of non-moisturizing dish soap in the very center. The colors will swirl around and look really cool for quite a while!
homemade GAK
Homemade GAK is soooooooooooo fun to make. There's a great recipe here. We found neon food coloring in the store and it worked great. Highly recommended! It keeps for a few days in a ziplock.
I haven't yet found a recipe that doesn't use a whole lot of glue, so this one tends to be better for small groups. Don't let it dry on your clothes!
I haven't yet found a recipe that doesn't use a whole lot of glue, so this one tends to be better for small groups. Don't let it dry on your clothes!
Labels:
gak,
rainy day activities,
recipe,
things to do with kids
Bubble Painting
Bubble Painting is fun and cheap and totally addictive. Make little cups- a ramekin or little yogurt cups will do fine, though something short is better for bubbling-purposes here.
Mix about 1/4 to 1/2 cup of water with a little squeeze of dish soap in each of your containers. Add a LOT of food coloring. Blow with a straw till you've got a nice dome of bubbles over the container. Gently blot a piece of paper down on top of them to "catch" the bubbles.
I recommend a smaller piece of paper (1/4 a sheet of printer paper) so you can catch your bubbles without worrying about picking up nearby bubbles. Try layering one color on top of another! Like the blow painting paper, this final product can be used to stationary, paper collages, etc.
These dry very quickly and will be touch-safe within a few minutes.
P.S. My mom adds: "for bubble painting, the adult who is not as familiar with the tendencies of participants might want to demonstrate/practice "blow" vs. "suck" and/or make a tiny pin prick in the straw, between the bend and the mouth!"
Mix about 1/4 to 1/2 cup of water with a little squeeze of dish soap in each of your containers. Add a LOT of food coloring. Blow with a straw till you've got a nice dome of bubbles over the container. Gently blot a piece of paper down on top of them to "catch" the bubbles.
 |
| This picture is dark but they do turn out very cool, I promise! |
I recommend a smaller piece of paper (1/4 a sheet of printer paper) so you can catch your bubbles without worrying about picking up nearby bubbles. Try layering one color on top of another! Like the blow painting paper, this final product can be used to stationary, paper collages, etc.
These dry very quickly and will be touch-safe within a few minutes.
P.S. My mom adds: "for bubble painting, the adult who is not as familiar with the tendencies of participants might want to demonstrate/practice "blow" vs. "suck" and/or make a tiny pin prick in the straw, between the bend and the mouth!"
Subscribe to:
Posts (Atom)


